Extend Istio Ambient Mesh with Kgateway as Waypoints
Lin Sun
Apr 14, 2025
Ambient mesh is the new sidecarless data plane mode in the Istio service mesh. One of the key innovations of ambient mesh is that it splits Istio’s functionality into two distinct layers: a lightweight, secure overlay layer (implemented by a purpose-built node proxy called ztunnel) and a Layer 7 processing layer (implemented by L7 proxies called waypoints). As we designed ambient mesh with two distinct layers, we purposefully kept the secure overlay layer very lightweight with minimal function. The L7 layer was designed to be feature-rich and pluggable, enabling you to use your preferred L7 proxy as your waypoint.
But why choose kgateway as your waypoint? Kgateway is the first project that can be used as a pluggable waypoint for Istio. Built on the same Envoy engine that Istio’s waypoint implementation uses, there are nonetheless differentiators that make the use of kgateway as a waypoint a compelling alternative.
Why Choose Kgateway for Your Waypoint?
While Istio ambient provides a default waypoint proxy, there are several scenarios where kgateway can offer a more powerful alternative:
You are using or plan to use kgateway to control traffic in or out of your cluster
Most Istio users have two completely different gateway implementations: proxies for ingress (for “north-south” traffic) and proxies for internal service-to-service traffic (“east-west” traffic — in the traditional model, implemented by a mesh of sidecar proxies).
Kubernetes Gateway API is rapidly becoming the standard for networking in Kubernetes, with more than two dozen projects already supporting it. Kgateway is a feature-rich, fast and battle-tested gateway that integrates seamlessly with Kubernetes. It extends the Gateway API to provide advanced features like rate limiting, timeouts, header manipulation, and request transformations.
For applications that need to communicate with external services (like cloud APIs or LLM providers such as OpenAI), traffic control becomes even more critical. In such cases, using kgateway as an egress gateway can help manage costs, API key security, and caching, while ensuring sensitive data isn’t leaked.
Kgateway’s support for acting as a waypoint proxy offers users the chance to use a single system for both traffic directions. Even though the Gateway API lets you use the same terminology, there are differences in implementation, scalability, and performance even between projects using the same engine, like Kgateway and the default Istio waypoint. Many organizations already rely on kgateway to manage their north-south traffic, and it offers the same capabilities for east-west traffic in ambient mesh.
By using kgateway both for ingress/egress and internal service traffic, you create a unified architecture, making it easier to manage and troubleshoot your traffic. With consistent observability, debugging, and operational experiences, you’ll reduce the complexity of having multiple gateway solutions.
You need rich L7 features that Istio’s default waypoint doesn’t support
If you aren’t using kgateway for north-south traffic, you can still take advantage of its advanced Layer 7 capabilities for east-west traffic in Istio. Kgateway offers first-class APIs for rate limiting, header manipulation, request transformations, external auth and processing — without the headache of EnvoyFilters.
EnvoyFilters — snippets of raw Envoy configuration programmed into Istio — are a common workaround, but they are notoriously difficult to configure, and prone to breaking with new releases. Despite being around for five years, the EnvoyFilter API remains in Alpha status, largely due to their fragility, and are not supported in ambient mode at all. By using kgateway, you avoid this issue and gain access to powerful L7 functions via simple, Kubernetes-native APIs.
How Does it Work?
I previously wrote a blog about waypoint proxies, where I described how you can make sense of waypoints as gateways. Just as you can swap your gateway with other gateways that implement the same Kubernetes Gateway API, you can similarly bring in your preferred waypoint proxy.
A waypoint proxy is deployed using the Gateway resource, where you specify the gatewayClassName to determine which proxy to use. The default class in an ambient mesh is istio-waypoint. However, to use kgateway, you simply change the gatewayClassName to kgateway-waypoint, like so:
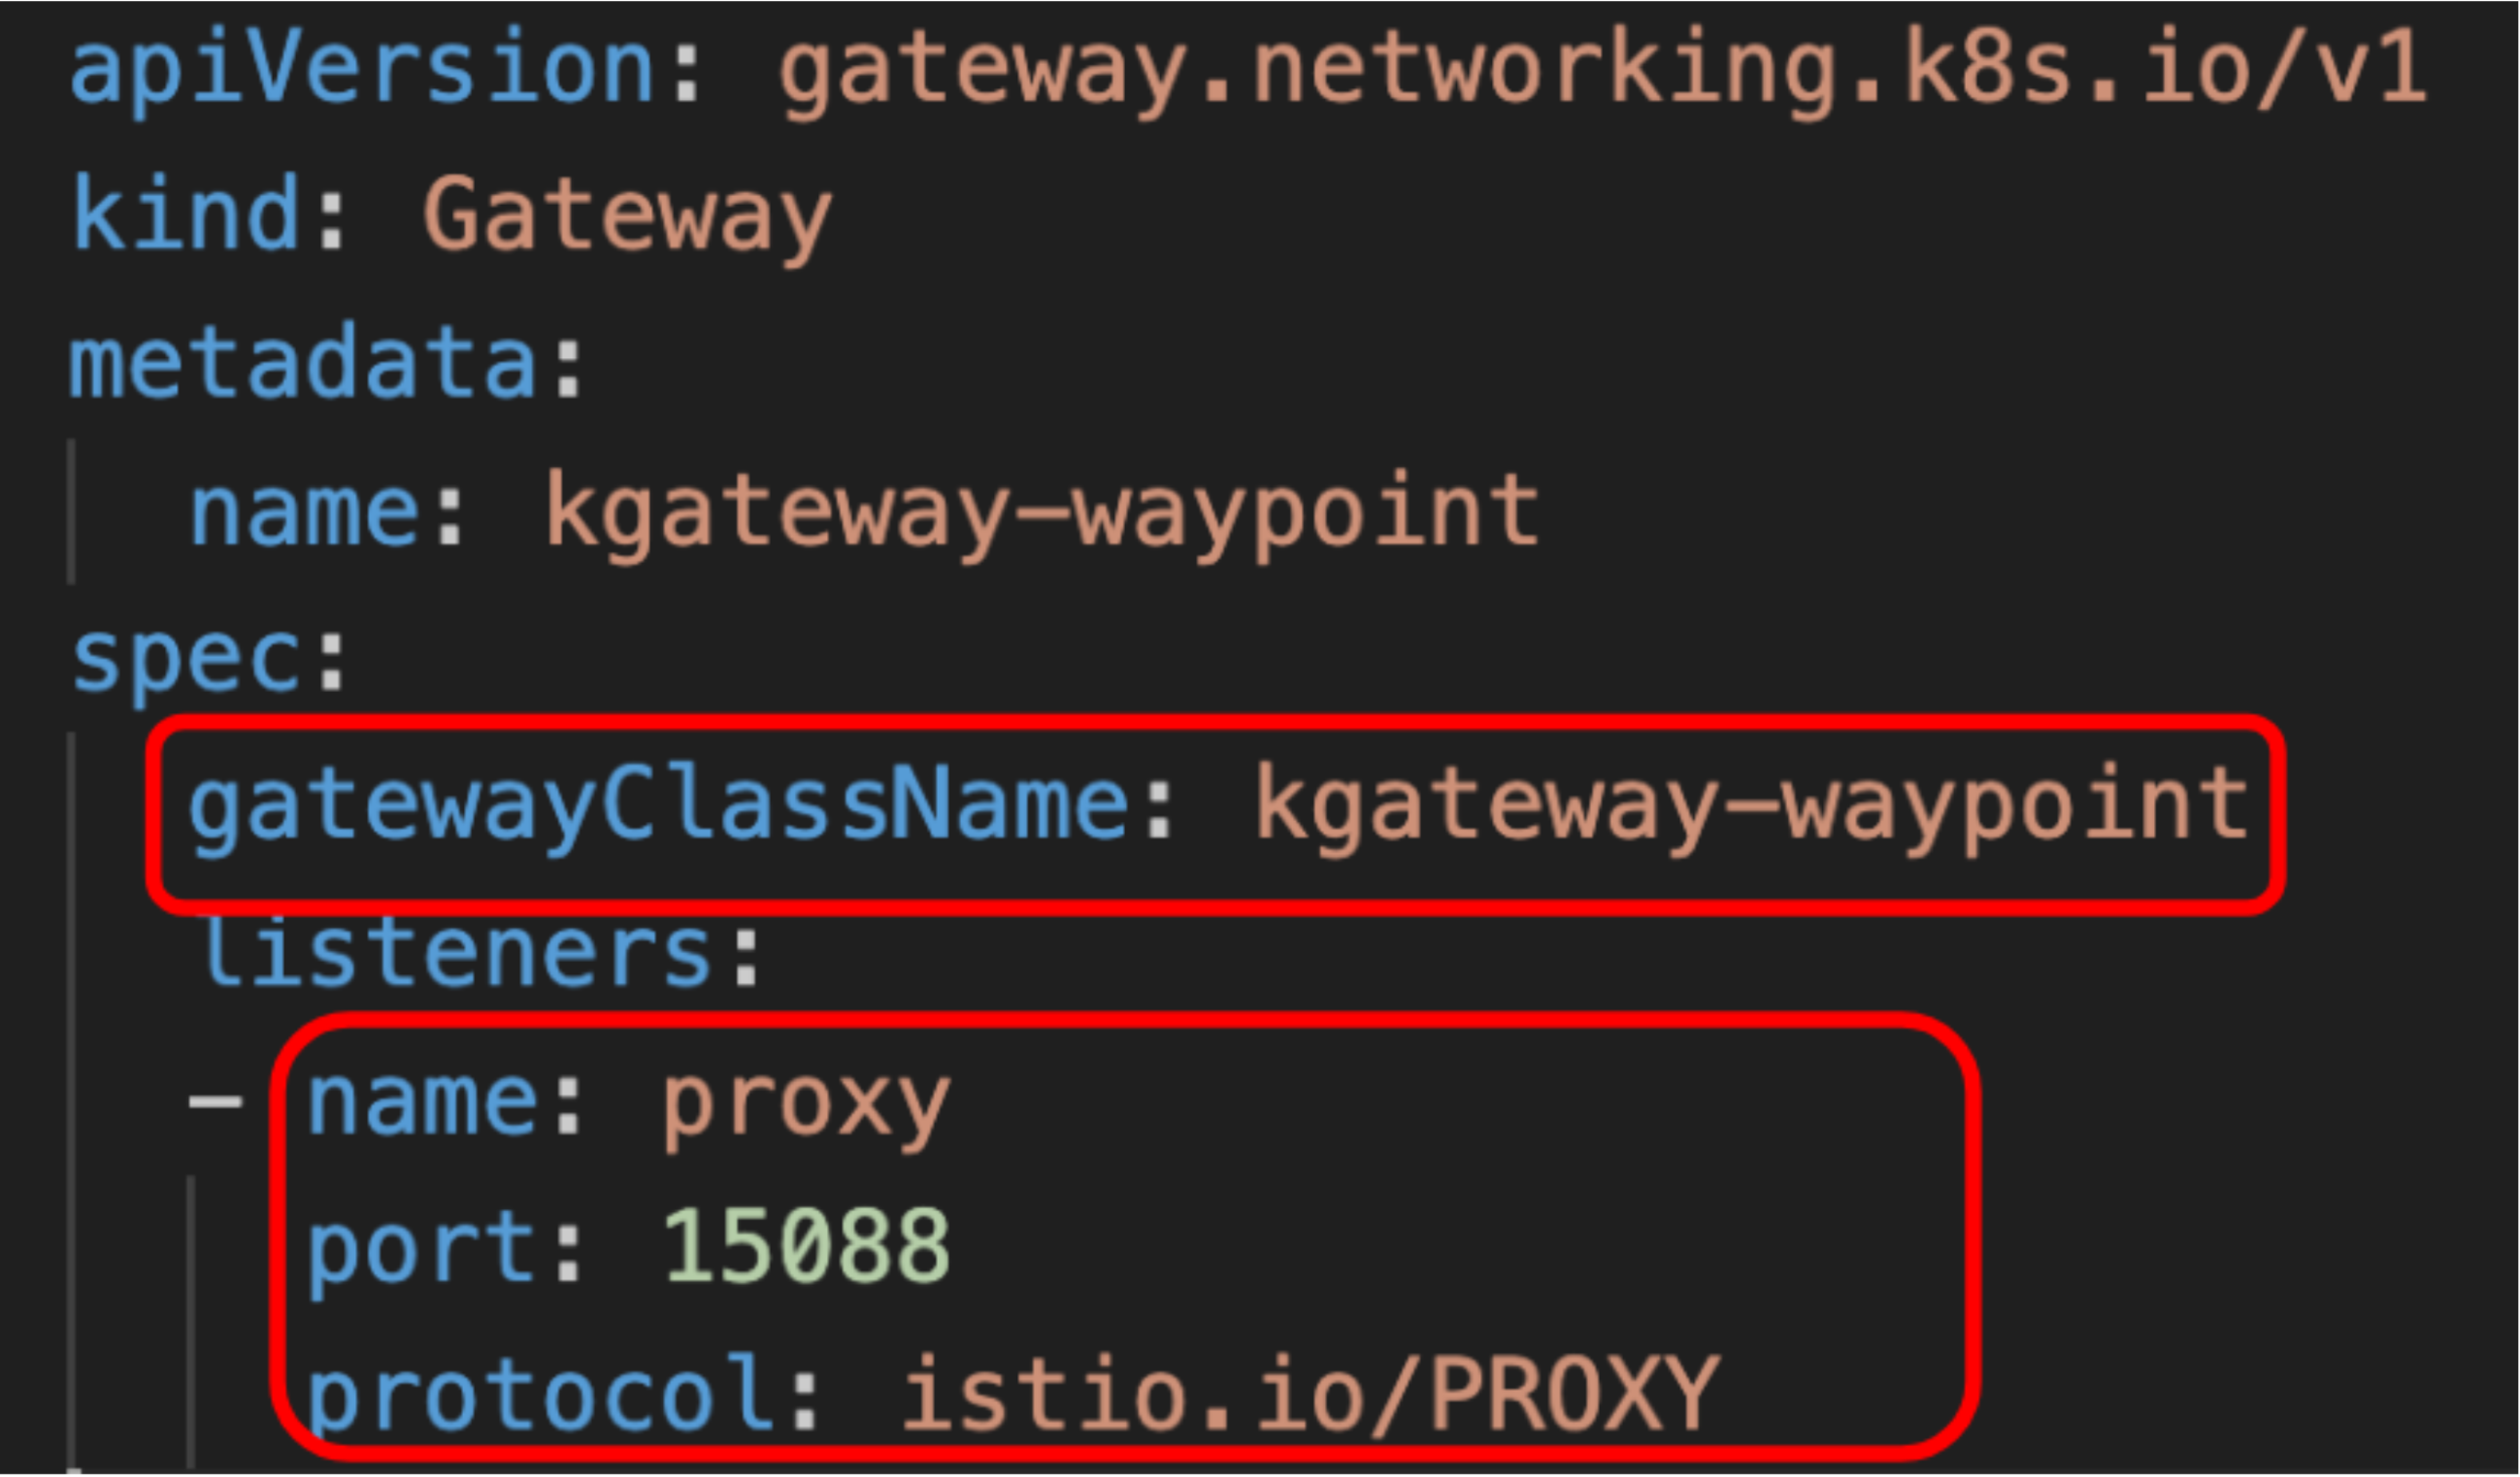
By default, Istio’s istio-waypoint listens on port 15008, but kgateway-waypoint uses port 15088 and supports the PROXY protocol for passing connection information.
Once deployed, the kgateway-waypoint controller automatically creates the necessary Kubernetes resources (Deployment and Service) for the waypoint. When Istio detects that this waypoint is being used as part of the data plane flow, it ensures that all client requests within the mesh pass through the waypoint before reaching their destination.
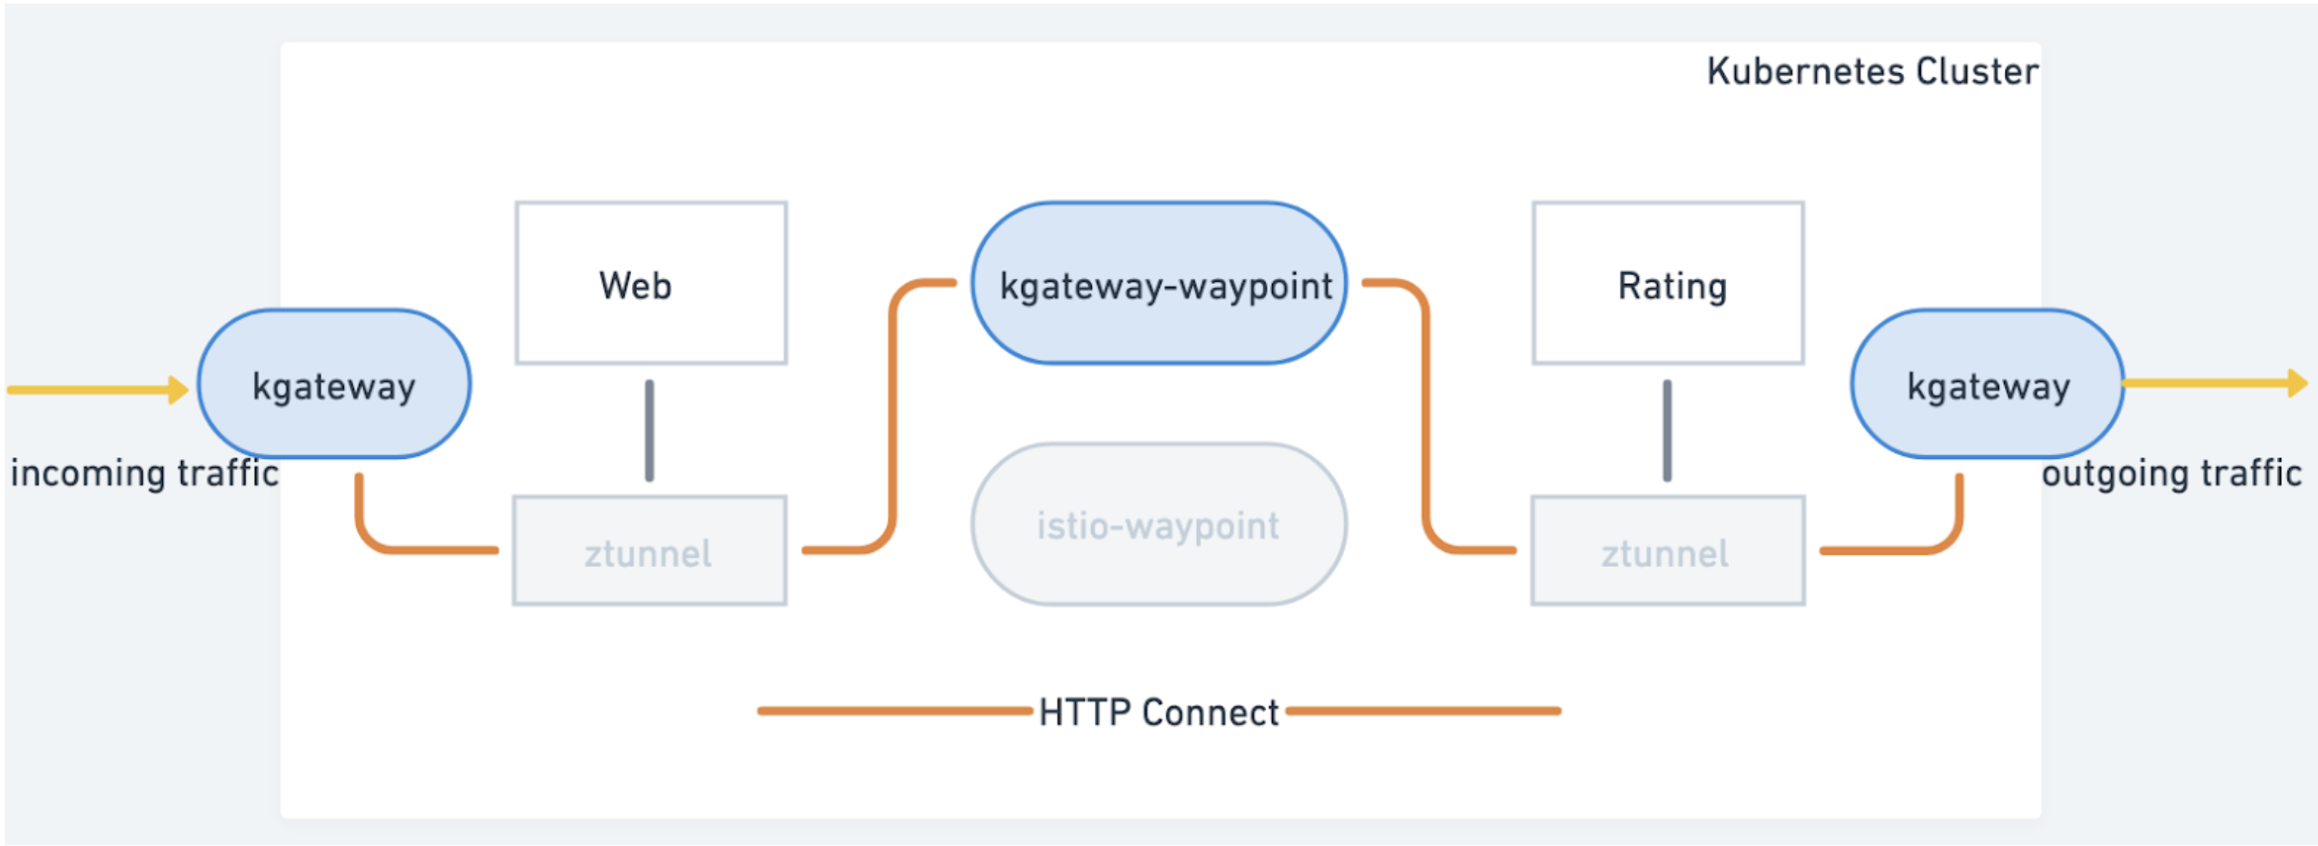
Seamlessly Integrating the Custom Waypoint into the Request Flow
Istio uses the status field in the Gateway resource to manage the waypoint proxy’s integration into the request flow. Here’s an example of the status section, which includes the waypoint’s service VIP (Virtual IP) address:
status:
  addresses:
  - type: IPAddress
    value: 10.96.104.12
  conditions:
  - lastTransitionTime: "2025-04-09T20:51:02Z"
    message: ""
    observedGeneration: 1
    reason: Accepted
    status: "True"
    type: Accepted
See It In Action
After you have Istio (v1.25 or newer) and kgateway (v2.0.0 or newer) installed in your Kubernetes cluster, you can deploy a kgateway-waypoint in your namespace using a Kubernetes Gateway resource.
Let’s assume you already have a client app and an Ollama StatefulSet running in the same namespace. To integrate kgateway as the waypoint proxy, follow these steps:
First, create the Gateway resource to deploy kgateway-waypoint within your namespace:
apiVersion: gateway.networking.k8s.io/v1
kind: Gateway
metadata:
  name: kgateway-waypoint
spec:
  gatewayClassName: kgateway-waypoint
  listeners:
  - name: proxy
    port: 15088
    protocol: istio.io/PROXY
Second, to ensure both the client app and ollama StatefulSet services are routed through the kgateway-waypoint, label your namespace as follows, after making sure the namespace is enrolled in the ambient mesh:
$ kubectl label ns default istio.io/use-waypoint=kgateway-waypointThis tells the ztunnel to route traffic through kgateway-waypoint for all services in the namespace. You can verify this with the following command:
istioctl ztunnel-config service

NAMESPACE    SERVICE NAME          SERVICE VIP   WAYPOINT              ENDPOINTS
default      client                10.96.143.111 kgateway-waypoint     1/1
default      kgateway-waypoint     10.96.235.185 kgateway-waypoint     1/1
default      ollama                10.96.238.187 kgateway-waypoint     1/1
Once configured, you can take full advantage of the L7 features offered by kgateway, such as rate limiting, header manipulation, and request transformation.
Example: Timeouts
Requests to LLMs may take longer than usual. You can easily modify the request timeout using an HTTPRoute resource.
$ kubectl apply -f - <<EOF
apiVersion: gateway.networking.k8s.io/v1
kind: HTTPRoute
metadata:
  name: ollama
spec:
  parentRefs:
  - name: ollama
    kind: Service
    group: ""
  rules:
    - matches:
      - path:
          type: PathPrefix
          value: /
      backendRefs:
       - name: ollama
         port: 80
      timeouts:
        request: "180s"
EOF
Example: Rate Limiting
To limit traffic, you can use TrafficPolicy to define a rate limit. Here’s an example that allows three requests per minute:
$ kubectl apply -f - <<EOF
apiVersion: gateway.kgateway.dev/v1alpha1
kind: TrafficPolicy
metadata:
  name: ratelimit
spec:
  targetRefs:
  - group: gateway.networking.k8s.io
    kind: HTTPRoute
    name: ollama
  rateLimit:
    local:
      tokenBucket:
        maxTokens: 3
        tokensPerFill: 3
        fillInterval: 60s
EOF
After applying this, if you send more than three requests within a minute, you’ll receive a 429 Too Many Requests response.
$ kubectl exec -it deploy/client -- curl http://ollama:80/ -v
* Host ollama:80 was resolved.
* IPv6: (none)
* IPv4: 10.96.238.187
*   Trying 10.96.238.187:80...
* Connected to ollama (10.96.238.187) port 80
* using HTTP/1.x
> GET / HTTP/1.1
> Host: ollama
> User-Agent: curl/8.12.1
> Accept: */*
>
* Request completely sent off
< HTTP/1.1 429 Too Many Requests
< content-length: 18
< content-type: text/plain
< date: Thu, 10 Apr 2025 18:12:29 GMT
< server: envoy
<
* Connection #0 to host ollama left intact
Example: Enable Access Logging
To enable access logging for the kgateway-waypoint, you can configure an HTTPListenerPolicy resource. This allows you to log traffic information such as request methods, response codes, bytes received/sent, and more. Here’s how to set it up:
Apply the access logging configuration
Create the HTTPListenerPolicy resource to enable access logs for the kgateway-waypoint:
$ kubectl apply -f - <<EOF
apiVersion: gateway.kgateway.dev/v1alpha1
kind: HTTPListenerPolicy
metadata:
  name: access-logging
spec:
  targetRefs:
  - group: gateway.networking.k8s.io
    kind: Gateway
    name: kgateway-waypoint
  accessLog:
  - fileSink:
      path: /dev/stdout
      jsonFormat:
          start_time: "%START_TIME%"
          method: "%REQ(X-ENVOY-ORIGINAL-METHOD?:METHOD)%"
          path: "%REQ(X-ENVOY-ORIGINAL-PATH?:PATH)%"
          protocol: "%PROTOCOL%"
          response_code: "%RESPONSE_CODE%"
          response_flags: "%RESPONSE_FLAGS%"
          bytes_received: "%BYTES_RECEIVED%"
          bytes_sent: "%BYTES_SENT%"
          request_id: "%REQ(X-REQUEST-ID)%"
          authority: "%REQ(:AUTHORITY)%"
EOF
Verify the log output
After deploying this configuration, check the logs from the kgateway-waypoint pod to confirm that access logging is working as expected. Here’s an example of what the log entry might look like when the rate limit configuration is triggered for your ollama StatefulSet:
{"authority": "ollama",
  "bytes_received": 0,
  "bytes_sent": 18,
  "method": "GET",
  "path": "/",
  "protocol": "HTTP/1.1",
  "request_id": "88c6504b-d3e3-4921-92af-d06f0f0ce877",
  "response_code": 429,
  "response_flags": "RL",
  "start_time": "2025-04-10T18:36:34.047Z"}
In this case, the log shows that the client attempted to make a request to the Ollama service but was rate-limited, as indicated by the response_code 429 Too Many Requests and the response_flags RL for rate limiting.
See a Demo
This video demonstrates the rate-limiting example in action:
Wrapping Up
I am super excited that the release of kgateway 2.0 brings a new level of extensibility to Istio’s ambient architecture. With the ability to seamlessly integrate kgateway as a waypoint proxy, you gain access to powerful Layer 7 functions while maintaining a unified traffic control experience across both north-south and east-west traffic.
By leveraging Kubernetes Gateway APIs, you can easily configure advanced traffic management features like rate limiting, request transformation, external processing (ExtProc), external Auth, and more — all without wrestling with complex Envoy filters.
Explore kgateway today, and reach out on the community Slack if you have any questions or need assistance!